KRAPOF® Slim Power Vac Help Page

Get all the details you need to set up, operate, and maintain your Slim Power Vac.
files/slim-vac-help-indicator-01.jpg
files/slim-vac-help-indicator-02.jpg
files/slim-vac-help-indicator-03.jpg

How to assemble the vacuum?

  1. Attach the telescopic wand to the LED Turbo head (black, no gold clips/buttons). Push together until you hear a click.
  2. Attach the dust bin to the handle by aligning the gold button groove with the handle lip. Swing upwards until it clicks.
  3. Connect the telescopic wand to the handle. Align and push until you hear a click.

    How to remove the dust bin from the motor?

    1. Press the Gold Button: Press down on the gold button located at the top.
    2. Remove the Dust Bin: While keeping the button pressed down, pull the dust bin to the left. Then, lift up to remove the dust bin.

      How to remove the filter from the dust bin?

      1. Locate the Filter Lip: Find the lip of the filter, which is the small black part that fits into a groove.
      2. Remove the Filter: Pull the filter upwards to remove it from inside the dust bin.

        How to assemble the filter inside the dust canister?

        1. Align the Grooves: Ensure that all grooves are correctly aligned when reassembling the filter into the dust bin. Incorrect alignment can cause the filter to become lodged.
        2. Check Each Groove: Verify that each groove on each side, as shown in the video, is properly aligned. Once aligned, push the filter into place.

          Battery & Runtime

          How long does it take for the battery to fully charge?

          It can take up to 4.5 hours.

          What is the battery use time?

          • MIN: 40 min - 45 min (Daily cleaning mode)
          • MAX: Up to 15 min (Max cleaning mode).

          When the vacuum is turned on it will automatically start in the medium mode.

          Is the battery removable?

          Yes the battery is removable. To remove the battery simply press down on the two gold clips either side of the battery and pull upwards.

          My battery isn’t lasting as long as it should?

          Your vacuum will automatically be on BOOST mode once turned on so you may want to change to ECO mode to ensure your battery lasts the maximum amount. 

          Make sure you charge both batteries for the full 4 hours before first use and after each use, to ensure the batteries health. We advise to take the battery off charge once fully charged. During first use, use the Slim Vac until it is completely out of power. This will condition the battery.

          Keep in mind that battery runtime varies depending on usage time and the type of surface being cleaned. For instance, vacuuming a thick carpet in BOOST mode will drain the battery more quickly than cleaning bare floors.

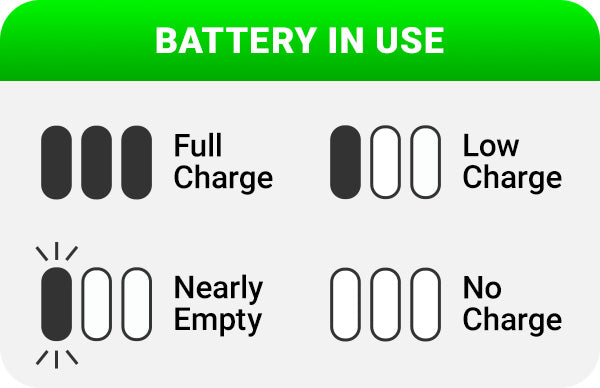
          What do the lights mean on the battery?

          • 3 blue lights = fully charged 100%
          • 2 blue lights = charged 50%
          • 1 blue light = low charge 25%

          Setup & Assembly

          How do I assemble the vacuum?

          1. Attach the telescopic wand to the LED Turbo head (black, no gold clips/buttons). Push together until you hear a click.
          2. Attach the dust bin to the handle by aligning the gold button groove with the handle lip. Swing upwards until it clicks.
          3. Connect the telescopic wand to the handle. Align and push until you hear a click.

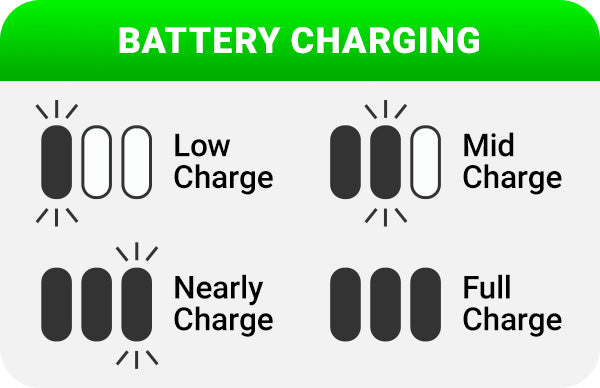
          How do I charge my battery?

          Charge the battery by plugging the provided charging cable into the side of the battery and into a power outlet. Only use the provided Kleva Range charging cable. The battery should take around 4 hours to be fully charged.

          • 3 blue lights = fully charged
          • 1 blue light = low charge

          I can’t find the screws for my Slim Vac Stand?

          The screws for the Slim Vac stand come in a very small poly packet, which can sometimes be easy to miss when unpacking the contents.

          Operation & Troubleshooting

          My Slim Vac isn’t turning on properly?

          To power on your Krapof Slim Vac, simply press the on/off button once and then release it - the vacuum will activate as intended. To turn off the vacuum, press the button once more. You do not need to hold the button down.

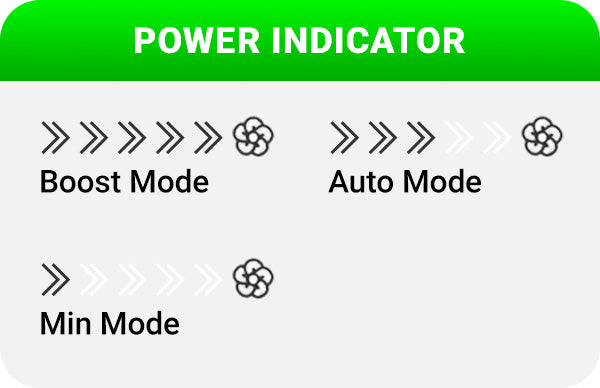
          What cleaning modes does the Slim Vac have?

          Here’s a brief explanation of the three power levels:

          1. Boost Mode (displayed as 5 arrows): This is the vacuum’s highest power setting, providing maximum suction for deep cleaning or tackling stubborn dirt. It's ideal for tough spots but drains the battery more quickly.
          2. Eco Mode (displayed as 2 arrows): Designed for energy efficiency, Eco Mode reduces suction power to extend battery life. It’s great for light cleaning and regular maintenance, offering a longer runtime between charges.
          3. Auto Mode: In Auto Mode, the vacuum automatically adjusts suction power based on the surface being cleaned. It balances power and battery life, optimizing performance for both carpets and hard floors.

          Your vacuum will automatically be on BOOST mode once turned on so you may want to change to ECO mode to ensure your battery lasts the maximum amount.

          Maintenance

          How do I change the filters?

          1. Remove the dust cannister from the vacuum
          2. Locate the Hepa Filter Lip: Find the lip of the Hepa filter, which is the small black part square shaped that fits into the groove of the cyclone filter and pull until the Hepa filter lifts out of the cyclone filter.
          3. Remove the black sponge from inside of the Hepa Filter.
          4. Remove the Cyclone Filter: Pull the Cyclone frame upwards to remove it from inside the dust bin.
          5. Then twist the Cyclone frame from the Filter frame anticlockwise to release, then pull upwards.
          6. To put it back together align the grooves: Ensure that all grooves are correctly aligned when reassembling the filter into the dust bin. Incorrect alignment can cause the filter to become lodged.
          7. Check Each Groove: Verify that each groove on each side, as shown in the video, is properly aligned. Once aligned, push the filter into place.

          How do I clean the filters?

          If your vacuum stops picking up dirt, the filters may need cleaning.
          Once you have removed the Hepa Filter and black sponge you will need to remove the Cyclone Filter. To do this:

          1. Pull the Cyclone frame upwards to remove it from inside the dust bin.
          2. Then twist the Cyclone frame from the Filter frame anticlockwise to release, then pull upwards.
          3. The Hepa Filter, black sponge, Filter Frame and Cyclone Frame can all be rinsed thoroughly with warm water.

          Ensure they air-dry completely for up to 48 hours before reinstalling to avoid moisture entering the electrical components. Tap off loose dirt between washes as needed, and clean more frequently if the vacuum is used heavily.